Here you will find a step-by-step description of how to configure your Microsoft Outlook 2010 email client manually to access your messages using the IMAP or POP3 connection protocol. This method should therefore only be used if the automatic configuration has failed, or if you encounter problems or errors when sending or receiving your messages. To configure POP3 access you will also have to go through the manual configuration.
The automatic configuration is done by adding a new account ("File" tab, "Information" section, then "Add an account"): check "Email account" and simply enter your name, email address and password, then click "Next". Your account will be automatically configured for IMAP access.
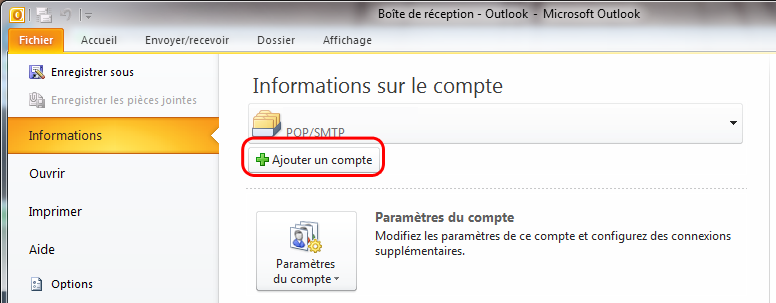
Creating the new Outlook access account
In the"File" tab of Microsoft Outlook 2010 for Windows, in the"Information" section, click on the"Add Account" button:
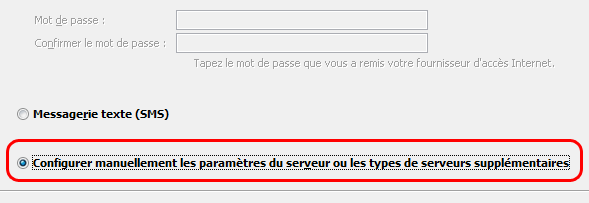
In the window for adding a new account, select"Manually configure server settings or additional server types", then click"Next" :
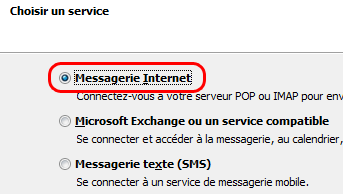
Select the"Internet Mail" service and click"Next":
You will then see the window that allows you to enter your email settings based on the preferred access type for your account: IMAP or POP3.
If you don't know which one to use, see our suggestions in the topic: What to choose between IMAP and POP.
Account Settings
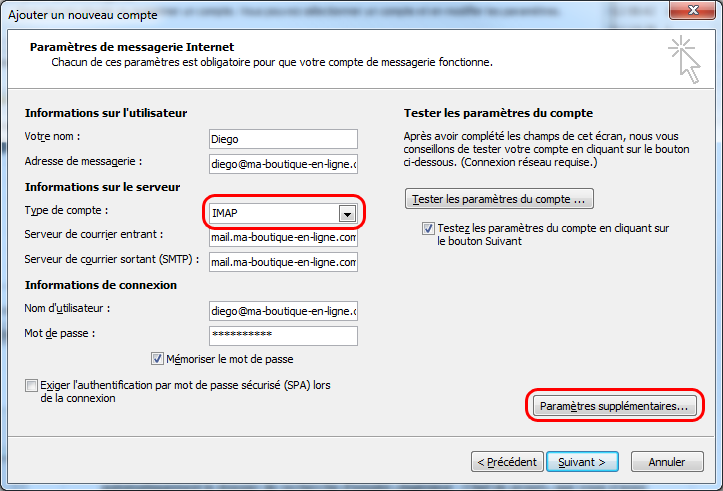
In the Internet Mail Settings window, enter the following information for your account:
User information
- Your name: Your first and last name, company name, etc... This is the name that will appear in the messages you send to your recipients. For example "Diego - TiZoo Support";
- Email address: The full email address of the account you are setting up, for example diego@ma-boutique-en-ligne.com;
Server Information
- Account type: select"IMAP" or"POP3" depending on the access mode you have chosen;
- Incoming mail server: enter your domain name preceded by "mail.", for example for the domain my-online-shop.com, you should enter mail.my-online-shop.com;
- Outgoing mail server: same as incoming mail server;
Connection information
- Username: The full email address of the account you are setting up (as for"Email Address"), for example diego@ma-boutique-en-ligne.com;
- Password: The password you set when creating your e-mail address (for more information, please see: How do I create an e-mail account on my domain? and How do I retrieve my e-mail account password?) ;
- Remember password: check this box if you want Outlook to remember your password. In general it is convenient to leave it checked because it will save you from having to enter your password every time you want to check your messages.
You should get a pop-up window that looks like the one below. Click on"Additional Settings" (in red below) to properly configure the connection to our servers:
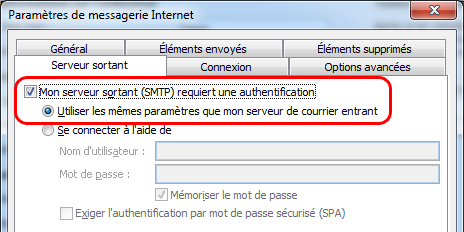
In the advanced internet mail configuration settings, first select the"Outgoing server" tab, to enable outgoing server (SMTP) authentication there using the same settings as incoming mail:
Now select the"Advanced Options" tab and depending on the access mode chosen:
IMAP configuration
Make the following entries in order:

- Use the following encrypted connection type: select"SSL";
- Incoming server (IMAP): check that 993 appears automatically, otherwise enter this value;
- Use thefollowing encrypted connection type: select"SSL";
- Outgoing mail server (SMTP): enter 465;
- Press the"OK" button.
POP3 configuration
Make the following entries in order:
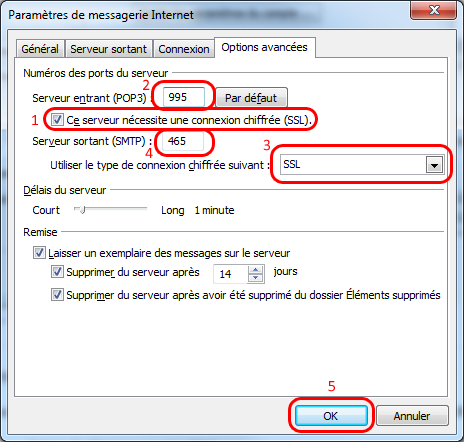
- This server requires an encrypted connection (SSL): check the box;
- Incoming server (POP3): check that 995 appears automatically, otherwise enter this value ;
- Use the following encrypted connection type: select"SSL";
- Outgoing mail server (SMTP): enter 465;
- Press the"OK" button.
Once back to the main window of your email settings, click"Next" to test that your account settings are correct, check them if necessary.
Note: If Outlook reports an authentication problem, certificate validity or a connection problem, make sure you have a valid SSL certificate generated for your domain: How to generate a valid SSL certificate for your email connection?
Then you can click on"Finish" to return to Outlook.
Congratulations: your email account is now configured and ready to use!