You can create your own personalized email address using your registered domain names.
For example, if you own the domain something.ch, you can create e-mail addresses such as nom.prenom@something.ch or service.clients@something.ch, etc...
You will find below how to proceed:
Step 1: login
First of all, you have to connect to your Control Panel. If you don't remember how to do it, here is how to proceed: How do I log in to my account?
Step 2: Account creation
- In the"E-MAIL" tab of your Control Panel, click on the"Email Accounts" icon. Once in the management of email accounts, click on the"+ Create" button (top right of the list of accounts), you will then have access to the interface allowing you to create a new email address:
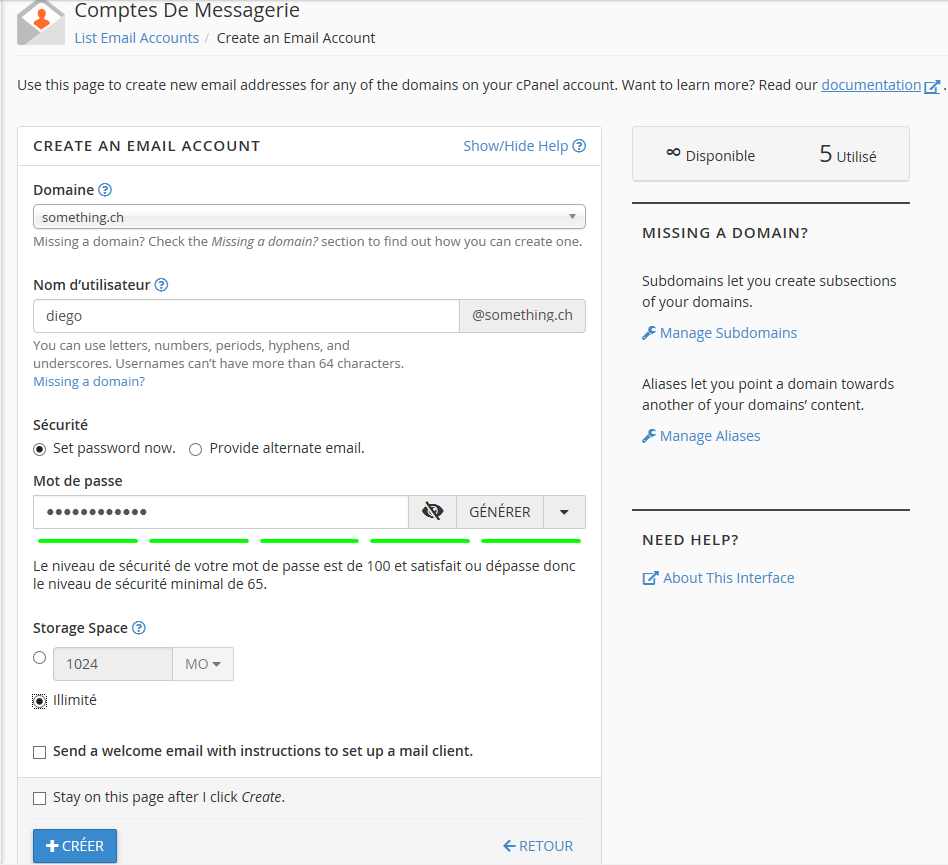
- If you manage multiple domain names, you can choose the domain you want to add your email account to (the "name" that is after the "@" in the email address). Simply select the domain name in the"Domain" field.
Note: If you have only one domain name available it will be automatically proposed to you and you will not have the possibility to make a choice; - In the"User name" field, choose a custom name for your email account. For example for"diego@something.ch", enter"diego";
- Choose or generate the password that will be used to access your new e-mail account. Remember to remember it or store your new password in a safe place to avoid losing it.
You can opt to send a temporary password by e-mail to an alternative address, where the user can set their own password. To do this, check"Provide alternate email" and enter the alternate email address where the account opening message will be sent. - Quota (Storage Space): you can assign a quota which is nothing else than a limitation of the total size of emails that can be stored in your new mailbox. This is especially useful if you create e-mails for other members of your team, for example, in order to limit their consumption of disk space.
You can as well choose the value"Unlimited" in which case it will be yourDisk Usage quota that will be the limit, depending on your subscription.
In any case your disk space quota (whose size depends on your subscription) will prevail as the limit for all the e-mail accounts used.
Tip: You can check the status of your disk space usage under the"Disk Usage" label in the"STATISTICS" tab of your Control Panel. - Finally, validate the creation of your account by pressing the"+ Create" button. Your new account is then created and it appears in the list of e-mail accounts that you manage.
Step 3: accessing the account
To consult the emails of your new account you have several options, you will find detailed information to be able to access them either directly via your browser (WebMail) or by using your preferred email client in the following topics of this FAQ:
- How to configure my mail program automatically?
- How do I configure my e-mail program?
- How to access WebMail ?
- How do I configure my iPhone to access my e-mails?
- How to configure Mozilla Thunderbird to access my e-mails?
- Microsoft Windows - Microsoft Outlook 2010 : Manual configuration
- Microsoft Outlook Express 6 : Manual configuration
- Mac OS X - Microsoft Outlook 2011 : Manual configuration
- How do I configure the Mail application (mail.app) of MacOS X to access my e-mails?