Here is how to configure your Mozilla Thunderbird email client.
Note: The Thunderbird version used to take the screenshots below is 45.6.0 on Microsoft Windows. You may find some minor differences in the appearance of the interface if you do not have the same version of Thunderbird, if you are using a different version of Windows, or if you are using Mac OS X.
In the main window of Mozilla Thunderbird, click on the"Menu" button (top right corner of the window):
Then in the"Options" (Windows) or"Preferences" (Mac OS X) menu, select the"Account Settings" item:

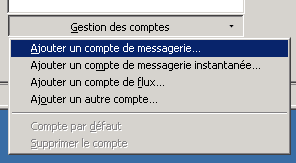
In the window for managing your account settings that appears, at the bottom left, press"Account Management" and then select"Add an email account... " :

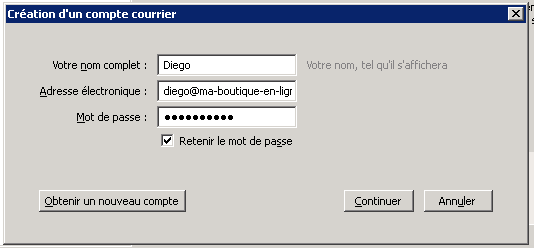
In the window for creating a new account that appears, enter the following information:

- Your full name: Your first and last name, company name, etc... This is the name that will appear in the messages you send to your recipients. For example "Diego - TiZoo Support";
- E-mail address: The complete e-mail address of the account you are setting up, for example diego@ma-boutique-en-ligne.com;
- Password: The password you set when you created your email address (for more information, please see: How do I create an email account on my domain? or How do I retrieve my email account password?) ;
- Remember password: check this box if you want Thunderbird to remember your password. In general, it is a good idea to leave it checked because it will save you from having to enter your password every time you want to check your messages;
- Click on the"Continue" button to continue the procedure.
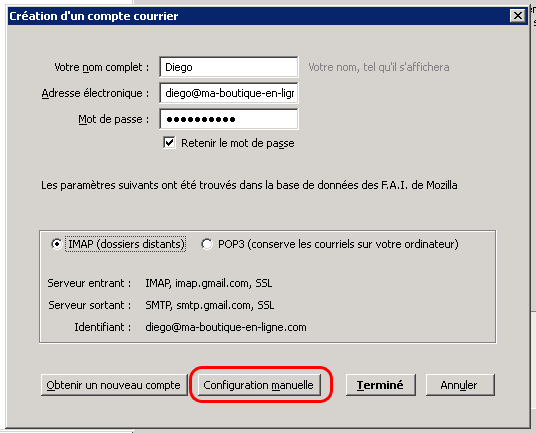
After the verification, which may take a few seconds, your account is normally correctly configured and you can press the"Finish" button. However, if you encounter problems or error messages when sending and/or receiving your e-mails, we advise you to check that the settings to be applied have been correctly detected by continuing to read the following.
Checking the connection settings :
In the previous step, instead of pressing "Finish", press the"Manual configuration" button at the bottom of the window:

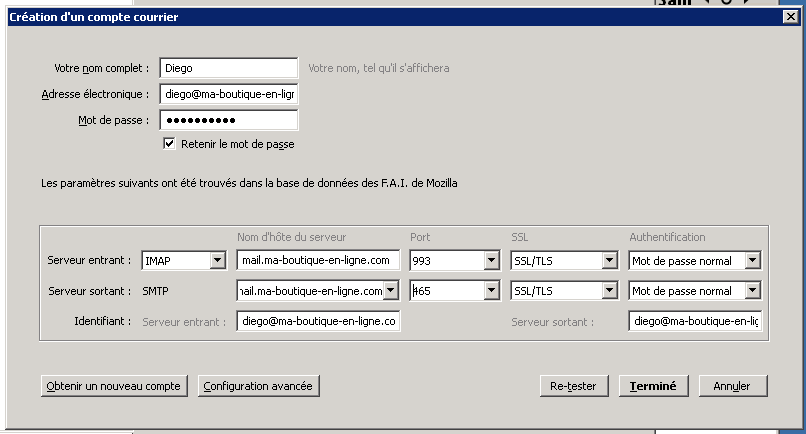
Finally, in the manual configuration window that appears, check that the settings are correct:

- Incoming server line: Select"IMAP" or"POP". If you don't know which one to use, see our suggestions in the topic: What to choose between IMAP and POP?
- Server host name: Enter your domain name preceded by "mail.", for example for the domain my-online-shop.com, you should enter mail.my-online-shop.com;
- Port:
- If you are accessing in IMAP mode: 993 (as in the image above);
- If you access in POP mode: 995.
- SSL: Select"SSL/TLS";
- Authentication: Select"Normal password";
- Outgoing server (SMTP) line:
- Server Host Name: Same as Incoming Server;
- Port: 465;
- SSL: Select"SSL/TLS";
- Authentication: Select"Normal Password";
- Line Identifier:
- Incoming server: the e-mail address of the account being configured;
- Outgoing server: the e-mail address of the account being configured;
- If you had to correct or modify a parameter, click on the "(Re-)Test" button to validate your parameters.
Note: Whatever the chosen connection mode, if the application reports an authentication problem, a certificate validity problem or a connection problem, check that you have a valid SSL certificate generated for your domain: How to generate a valid SSL certificate for your e-mail connection? - You can press the"Done" button to finalize the creation of your email access account.
Congratulations: your email access account is now configured and ready for use!