
FileZilla is a free software under GNU/GPL license. Currently it is one of the most popular programs for transferring files using FTP (File Transfer Protocol) or SFTP (SSH-FTP) under Microsoft Windows, but there is also a version for MacOS, Linux and older versions of Windows (32 bits).
You will find here how to install it, how to configure it and how to transfer files between your computer and your disk space hosted on our servers. The version of FileZilla used to make the screenshots is version 3.25.1, French under Windows. It may have some minor graphical differences from yours if you don't have the exact same version.
Step 1 : Installation
You have to start by downloading FileZilla, preferably from their official website: FileZilla Project
On the left, click in the "Download" section;
In the page that appears, select the version to download that corresponds with your operating system (Windows 32 bits (old) or 64 bits (recent), MacOS, Linux, ...) ;
Once the file is downloaded, you can install it. The installation method depends on your operating system, you generally have to double-click or run the downloaded file and follow the instructions of the FileZilla installer: don't forget to choose the language that corresponds to you to have a practical and pleasant interface to use.
Once FileZilla is installed, you can start it and proceed to the next step, paying attention to the desired connection mode: FTP for a standard connection or SFTP for a secure connection.
Step 2 : Configuration
Follow the steps below in order to set up your FTP access to our servers:
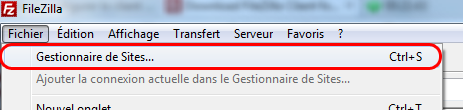
- Open the site manager. To open the site manager you can do it in one of three ways:
- Click on the site manager icon
 ;
; - Use the "Ctrl+S" shortcut: press the "Ctrl" key on your keyboard, then the "S" key while holding down the "Ctrl" key;
- In the "File" menu, select the "Site Manager..." item (in red on the image). (in red on the image):
- Click on the site manager icon
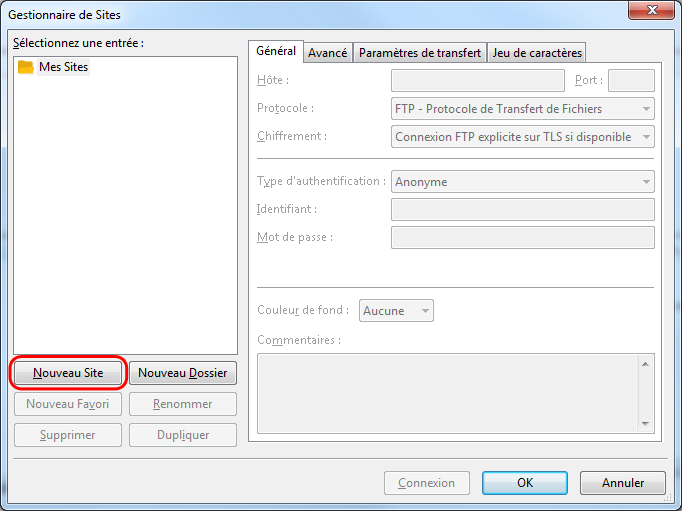
- Once the site manager is open, click on the "New Site" button:
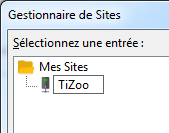
- Give your access a name, for example "TiZoo", then press enter:
- On the right hand side, enter your connection settings in the "General" tab:
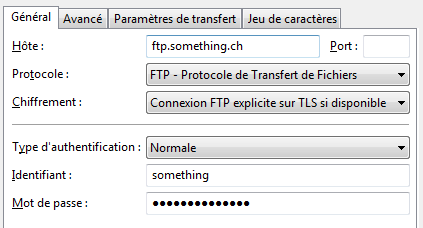
- "Host" : the name of your ftp server, it is your domain name prefixed by "ftp.", for example for the domain "something.ch", it will be "ftp.something.ch" ;
- Leave the "Port" field blank;
- "Protocol" select the desired connection protocol: FTP or SFTP;
- For an FTP connection only, in the "Encryption" field leave or select "Explicit FTP connection over TLS if available" ;
- "Authentication type": select "Normal";
"User ID": Your login ID, for the main account, the ID that was provided to you when you created your account (the same as for logging into your control panel).
If you have created other FTP accounts in your control panel, then the login will be in the form "name@something.ch" ("something.ch" being the domaine name for which you have created/added an FTP account). - "Password": for the main account this is the same password that was provided to you when you created your control panel account.
If you have created other FTP accounts in your control panel, this will be the password you set when you created the FTP account you want to configure.
Note that in some configurations, saving the password will not be possible. You will have to enter the password at each connection. In other configurations, FileZilla will offer you to create a "Master Password". This password is not linked to our servers and can be chosen freely. It will serve as a unique password to decrypt all passwords you register with FileZilla.
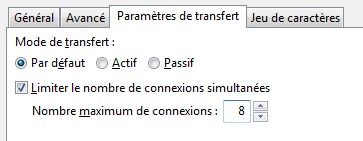
- Select the "Transfer Settings" tab and activate the "Limit the number of simultaneous connections" box, then enter the value "8" :
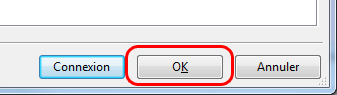
- Your access is now configured: You can click on the "OK" button to save your settings and close the Site Manager:
Once your access is configured according to your wishes, you can proceed to the next step to transfer your files.
Step 3: Connection and file transfer
Here are some explanations about the connection and transfer of files between your computer and your space hosted on our servers.
Your FileZilla interface is divided into four main areas, on the image below they are highlighted by a red, blue and green frame: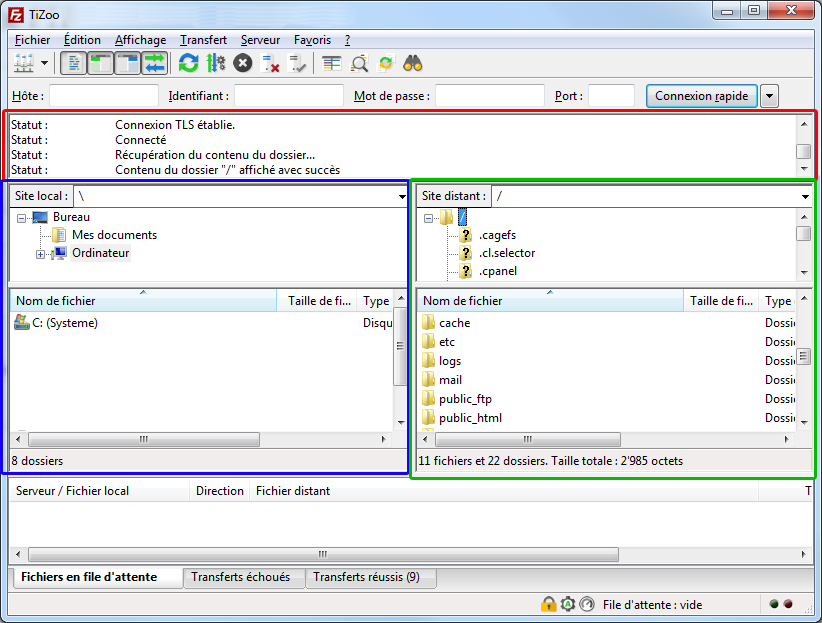
- In red: the upper pane gives you information about the status of your connection and exchanges with the server;
- In blue : the left pane allows you to browse your own computer and select the files to be uploaded to the server;
- In green : the right pane allows you to browse your hosted space to select the files you want to retrieve when transferring to your computer (download);
- At the bottom : the current transfers pane, which gives you information about the files being transferred.
Connection
First of all, try to connect by clicking on the drop-down menu to the right of the Site Manager icon: Select the site you want to connect to, in our case it is the site we just configured in step 2, "TiZoo": 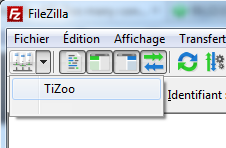
In the upper pane (in red) of the FileZilla interface you will see the information messages concerning the attempt to connect to the FTP server, if you see the status "Connected", it means that the connection is correctly established and everything is working properly. You will then see the tree structure and the files located on your space hosted on our servers (in green).
Note: if you can't see the tree structure of your hosting space or connect, check your connection parameters (login, password, etc...). If necessary, here are some solutions to the most common connection problems:
- Some ISPs or modem routers have too strict rules or do not know how to handle FTP transfers, to counter this, you can force the transfer mode "Passive" by changing the settings of your site in the Site Manager, "Transfer Settings" tab, then check the "Passive" box;
- If forcing passive mode does not solve your problem, try connecting using SFTP rather than FTP, as described in step 2 above.
File transfer: send/upload
To send files from your computer to your hosting, you must do the following:
- In the right pane (green), choose the location where you want to store your files in your hosting space. For example in public_html to install your new website developed at home or a CMS to install;
- In the left pane (blue): navigate in the tree of your computer until you find the files and/or folders to transfer to your space.
Tip: you can select several files and/or folders by holding down the "Ctrl" key. - Then right-click on one of your files or folders selected for transfer (left/blue pane), and in the context menu that appears, select "Send".
Note: If you already had identical files or folders in your hosting space, FileZilla will open a dialog box asking you what action to take for each file concerned. If you want to do the same action for all the files in your transfer, check the "Apply only to current queue" box. - FileZilla will notify you when all your files have been transferred. Note that this operation can take a very long time if you have a large volume of data and/or many files to transfer.
File transfer: receive/download
To download files from your hosting to your computer, for example to make a backup of your website files, the operation is very similar to that of sending/uploading, but by reversing the shutters used, here is how to proceed:
- In the left pane (blue), choose the location where you want to store your files on your computer;
- In the right pane (green), browse your hosting space until you find the files and/or folders you want to upload to your computer. For example public_html to save the files of your main website.
Tip: you can select multiple files and/or folders by holding down the "Ctrl" key. - Faites ensuite un clic droit sur un de vos fichiers ou dossiers sélectionnés pour le transfert (volet de droite/vert), et dans le menu contextuel qui apparaît, sélectionnez "Télécharger".
Note: If you already had identical files or folders on your computer, FileZilla will open a dialog box asking you what action to take for each file involved. If you want to do the same action for all the files in your transfer, check the box "Apply only to the current queue". - FileZilla will notify you when all your files have been downloaded. Note that this operation can take a very long time if you have a large amount of data and/or many files to transfer.